Studio Fx


トップページ リナックス導入記 ブルガダ研究所 徒然なる日々 ブックマーク 管理人室

リナックス導入記

フレッツ光をはじめるぞ!

1.設定前の確認
フレッツ光に加入していて以下の情報がわかること。
ログインID
ログインパスワード
プライマリDNS、セカンダリDNS(わからなくてもOK)
パソコンと回線終端装置をLANケーブルで接続していること。
PPPoE接続ソフトがインストールされていること(White Box Linux 4ならインストール済みです)。

2.ネットワークの設定
インターネットの接続にはLANポート「eth0」を使用します。
「eth0」に余計な設定がされているとトラブルの原因なので自動起動をしないよう設定します。
画面上のメニューから「アプリケーション」→「システム設定」→「ネットワーク」をクリック。
デバイス「eth0」を選択し「編集」をクリック。
「コンピュータの起動時にデバイスを起動」のチェックを外す。

ネットワークの設定

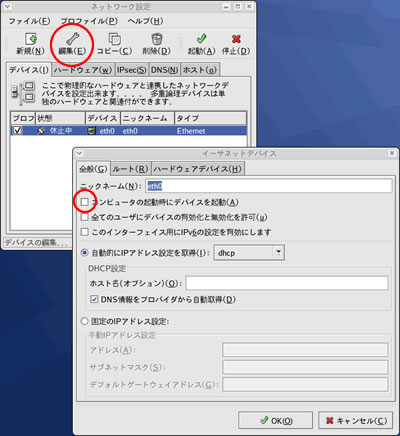
3.接続設定
右クリックからGNOME端末を開きます。
端末から「adsl-setup」と入力します。
ログインネームを聞かれるので入力して[Enter]を押します。
[root@localhost ~]# adsl-setup

Welcome to the ADSL client setup. First, I will run some checks on
your system to make sure the PPPoE client is installed properly...

LOGIN NAME

Enter your Login Name (default root):

4.使用するデバイスの設定
使用するデバイスを入力します。
「eth0」 でいいのでそのまま[Enter]を押します。
INTERFACE

Enter the Ethernet interface connected to the ADSL modem
For Solaris, this is likely to be something like /dev/hme0.
For Linux, it will be ethX, where 'X' is a number.
(default eth0):

5.アイドル時間の設定
そのままでいいので[Enter]を押します。
ちなみに秒数を入力すると自動的にその時間で切断されます。
Do you want the link to come up on demand, or 
stay up continuously?
If you want it to come up on demand, enter the idle time in seconds
after witch the link should be dropped. If you want the link to
stay up permanently. enter 'no' (two letters, lower-case.)
NOTE: Demand-activated links do not interact well with dynamic IP
addresses. You may have some problems with demand-activated links.
Enter the demand value (default no):

6.DNSサーバの設定
プロバイダで指定しているDNSサーバアドレスを入力してください。
プライマリとセカンダリの2回入力します。
プロバイダから指定のないときやわからないときは「server」と入力します。
DNS

Please enter the IP address of your ISP's primary DNS server.
If your ISP claims that 'the server will provide dynamic DNS addresses'.
enter 'server' (all lower-case) here.
If you just press enter, I will assume you know what you are
doing and not modify your DNS setup.
Enter the DNS information here.
Please enter the IP address of your ISP's secondary DNS server.
Enter the secondary DNS server address here:

7.ログインパスワードの入力
2回入力してください。
パスワードは画面には表示されません
PASSWORD

Please enter your Password:
Please re-enter your Password:

8.ユーザーによる接続の許可
そのままでいいので[Enter]を押します。
USERCTRL
 
Please enter 'yes' (two letters, lower-case.) if you want to allow
normal user to start or stop DSL connection (default yes):

9.ファイアウォールの設定
お好みですが自分は0(つまりファイアウォールなし)を選択しました。
FIREWALLING
 
Please choose the firewall rules to use. Note that these rules are
very basic. You are strongly encouraged to use a more sophisticated
firewall setup; however, these will provide basic security. If you
are running any servers on your machine, you must choose 'NONE' and
set up firewalling yourself. Otherwise, the firewall rules will deny
access to all standard servers like Web, e-mail, ftp, etc. If you
are using SSH, the rules will block outgoing SSH connections which
allocate a privileged source port.
 
The firewall choices are:
0 - NONE: Thisscript will not set any firewall rules. You are responsible
          for ensuring the security of your machine. You are STRONGLY
          recommended to use some kind of firewall rules.
1 - STANDALONE: Appropriate for a basic stand-alone web-surfing workstation
2 - MASQUERADE: Appropriate for a machine acting as an Internet gateway
                for LAN
Choose a type of firewall (0-2): 0

10.起動設定
システム起動時に自動的に接続を開始するかの選択。
そのままでいいので[Enter]を押します
Start this connection at boot time


Do you want to start this connection at boot time?
Please enter no or yes (default no):

11.設定の確認
今まで入力してきたことが表示されます。
よければ「y」を押して設定は完了です。
** Sammary of what you entered **


Ethernet Interface: eth0
User name:
Activate-on-demand: No
Primary DNS:
Secondary DNS:
Firewalling:        NONE
User Control:       yes
Accept these setting and adjust configuration files (y/n)? y
Adjusting /etc/sysconfig/network-scripts/ifcfg-ppp0
Adjusting /etc/resolv.conf
  (But first backing it up to /etc/resolv.conf.bak)
Adjusting /etc/ppp/chap-secrets and /etc/ppp/pap-secrets
  (But first backing it up to /etc/ppp/chap-secrets.bak)
  (But first backing it up to /etc/ppp/pap-secrets.bak)


Congratulations, it should be all set up!


Type '/sbin/ifup ppp0' to bring up your xDSL link and '/sbin/ifdown ppp0'
to bring it down.
Type '/sbin/adsl-status /etc/sysconfig/network-scripts/ifcfg-ppp0'
to see the link status.

12.インターネット接続
端末から「adsl-start」と入力すると接続。
また「adsl-stop」で切断、「adsl-status」と入力すると接続の確認ができます。
[root@localhost ~]# adsl-status
adsl-status: Link is up and running on interface ppp0
ppp0  Link encap:Point-to-Point Protocol
      inet addr:               P-t-P:                Mask:255.255.255.255
      UP POINTOPOINT RUNNING NOARP MULTICAST  MTU:1454  Metric:1
      RX packets:3 errors:0 dropped:0 overruns:0 frame:0
      TX packets:3 errors:0 dropped:0 overruns:0 carrier:0

      collisions:0 txqueuelen:3
      RX bytes:30 (30.0 b)  TX bytes:30 (30.0 b)


Studio Fx バナー
Send mail to "Studio Fx"